Lead Fusion
COMPLETE STEP BY STEP GUIDE
Key Concepts
- Lead Fusion is a custom app created by Mighty Digital, an IP Infusion vendor
- It works on the IP Infusion website (www.ipinfusion.com)
- A WordPress login is required
- The tool creates landing pages that are assembled from existing web page content (known as posts), using a 'content shopping' method, described below
- The landing pages can have custom elements, including vanity URL, banner image, headline, and description
Requirements
- Familiarity with content management concepts and systems
- WordPress experience is a plus, but not required
- Ability to create graphics, or access to a resource to have them created
STEP 1 - Get a WordPress login
Contact IPI's web management vendor Mighty Digital to acquire a login to the WordPress website.
| MIGHTY DIGITAL |
|---|
| Gaird Schlesinger |
| [email protected] |
| +1 (650) 533-9960 |
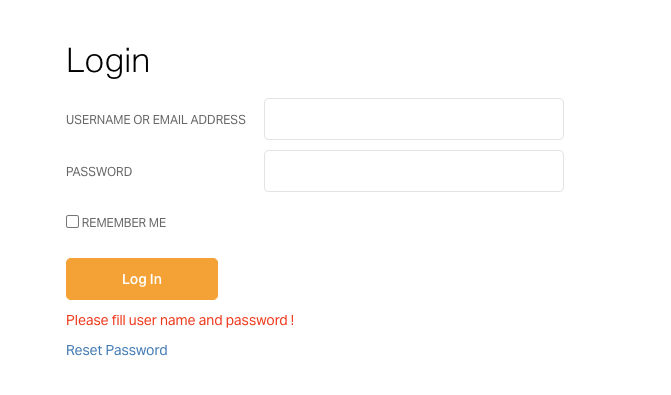
STEP 2 - Login to WordPress website
- Bookmark this URL in your browser: https://www.ipinfusion.com/wp-login.php
- Login to the IPI production website at that URL
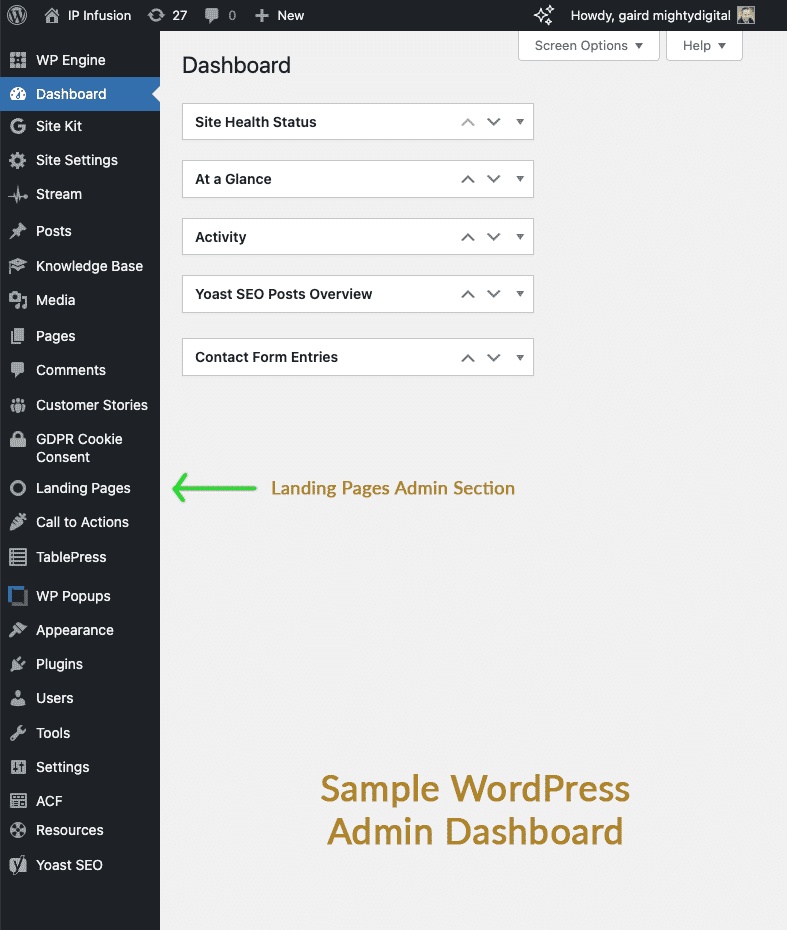
- Once you have landed at the dashboard, find the black navigation sidebar to the left side of the screen, this is the WordPress Admin Menu
- Approximately in the middle of this menu, look for an item named Landing Pages
IP Infusion Website Login
WordPress Admin Dashboard for IPInfusion website
STEP 3 - Create a Landing Page
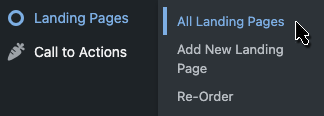
- Scroll over the Landing Pages menu, and select All Landing Page from the flyout Menu
- When the listing page loads, this is your main list of all landing pages created on the site (at first there may not be many, but the list will grow as you add pages)
- You can create a new Landing Page two different ways:
- At the top of the Admin UI in the black bar, click on '+ New', and in the drop down menu select Landing page
- In the left hand Admin black bar, the Landing Pages menu should be expanded, and you can select Add New Landing Page
- The minimum items required are a title, and selecting posts
- Enter desired page title in the title field. This text will become your vanity URL (known as a slug)
- Click the blue Publish button on the right side of the UI
- Click the Select Posts button to choose content
STEP 4 - Shop for content
- Click the blue button Select Posts
- You will be presented with the website front end, with a right-hand editing menu
- Navigate among pages on the website, and look for any content with an 'Add' link near it
- Pick any articles, and they will appear in the right-hand editing menu
STEP 5 - Add a Call to Action
- The default CTA is a Pardot contact form. It is the default shared CTA, and should be selected already. If not, enable it by clicking Yes on the 'Use a shared call to action?', and select Default in the menu just below
- If other CTAs have been setup, they will appear in the selection menu
- To add a custom CTA, turn the 'Shared call to action' button to No
- Two rich text editor fields will appear.
- The first CTA Content field will appear bottom left of the Landing Page, this is for text and any images you may choose. It supports HTML markup.
- The second CTA Form field will appear at the bottom right of the Landing Page. This should always be a sign up form, and if you are using the custom CTA you must prepare a Pardot form or have one ready to embed via iFrame
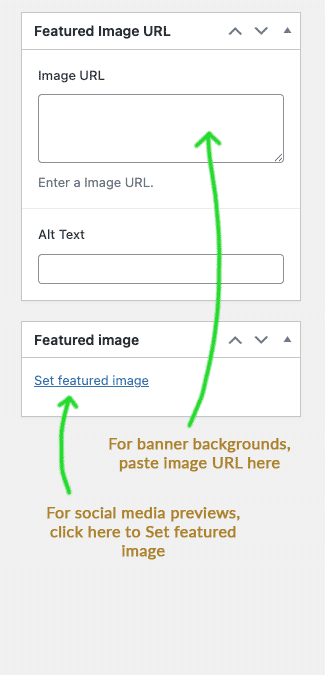
STEP 6 - Add an optional banner graphic and excerpt
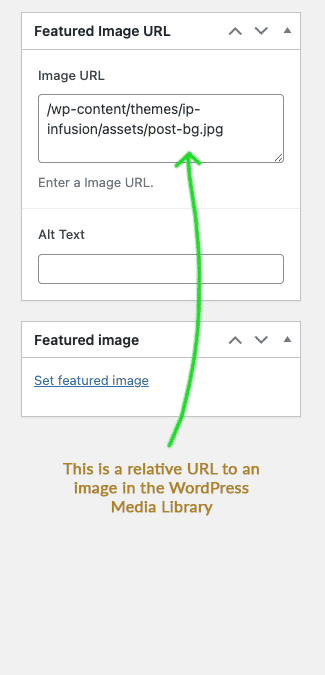
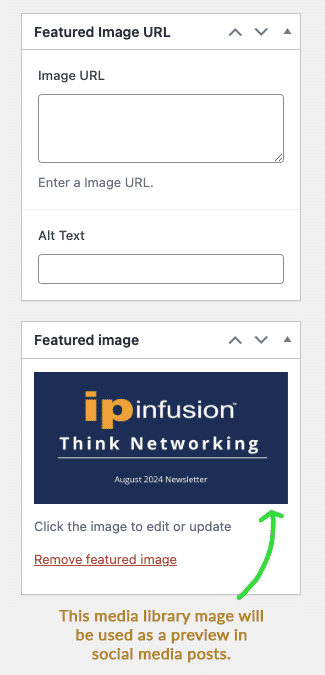
- Add an optional banner at the panel: Featured Image URL. The image can be hosted on a CDN that supports direct URL linking, it can be uploaded to the WordPress Media Library and enter the full or relative URL to the image.
ADDITIONAL CONCEPTS
Why Use Lead Fusion for Landing Pages?
Landing pages are designed to be simple pages that convert visitors to leads. While you can use the full content authoring system to make a more complex landing page—which is sometimes the way to go, this feature makes it much faster and easier to make simple ones
Making as many landing pages as possible, as quickly and easily as possible, allows Marketing and Sales to test content rapidly, in order to get more leads. The content, headlines, etc. are all intended to get that lead into the system, for Sales to follow up with the prospect.
Two Admin Areas of Lead Fusion in WordPress
The Lead Fusion feature has two main components in the WordPress Admin Dashboard
- Landing Pages
- Call to Actions
The two Admin areas have the following sub-navigation sections:
| Landing Pages | Call to Actions |
|---|---|
| All Landing Pages | All Call to Actions |
| Add New Landing Page | Add New Call to Action |
| Reorder | Reorder |
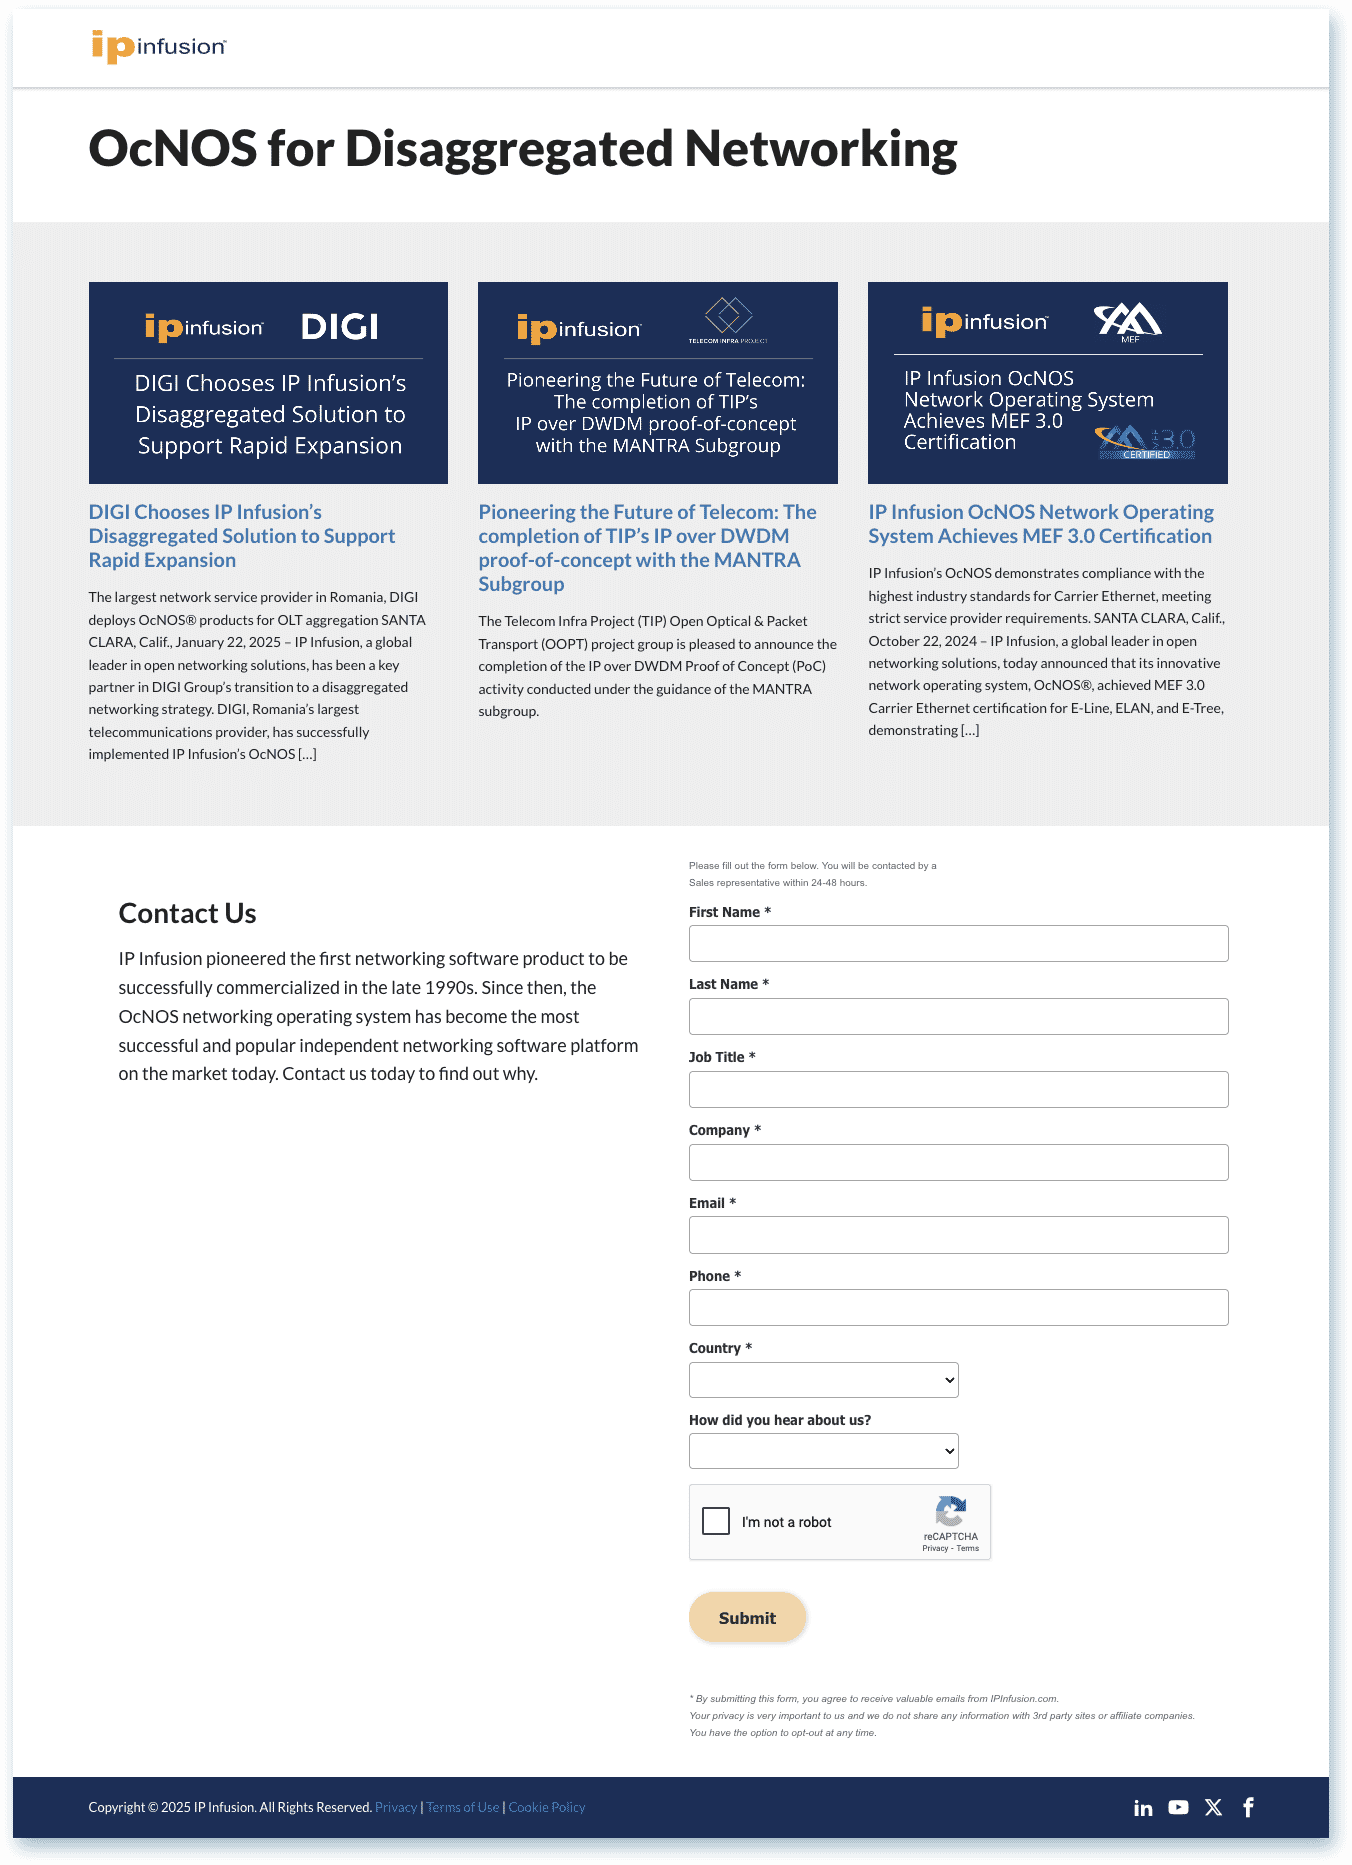
Anatomy of a Lead Fusion Landing page
Lead Fusion Landing Page components, from top to bottom
- Header
- Main Banner
- Contents
- Call to Action (lead gen form)
- Footer
The Header is a plain bar with the IP Infusion logo. Clicking the logo takes you to the home page of the IPI website.
The footer is the same as on the website; it includes copyright, policy links, social links, and GDPR/Consent tab.
Landing pages do not have all the website navigation of a regular page on the site, to keep the user focused on the content first, and ultimately the CTA. CTAs are usually web forms, and the desired result is to get the user to fill in the form so they can become a lead in the CRM.
About Banner Graphics
Landing page headlines are text only. By default they have no background image. You have the option to overlay that text on a graphic background to add visual interest or branding elements.
Banner Graphic Specifications
- Short 000 x 000
- Tall 000 x 000
- File format: JPG or PNG
Featured Image Graphic Specifications
These can vary among different social media providers. The most commonly used dimensions shown here are for LinkedIn blog post images. Other aspect ratios are supported for different post types. See this Image Size Guide on LinkedIn for more details.
- Width: 1200 x 627 pixels
- 1.91:1 aspect ratio
- File format: JPG or PNG
LANDING PAGE EXAMPLES
 Page with text headline, 3 articles and CTA (click image to enlarge) | 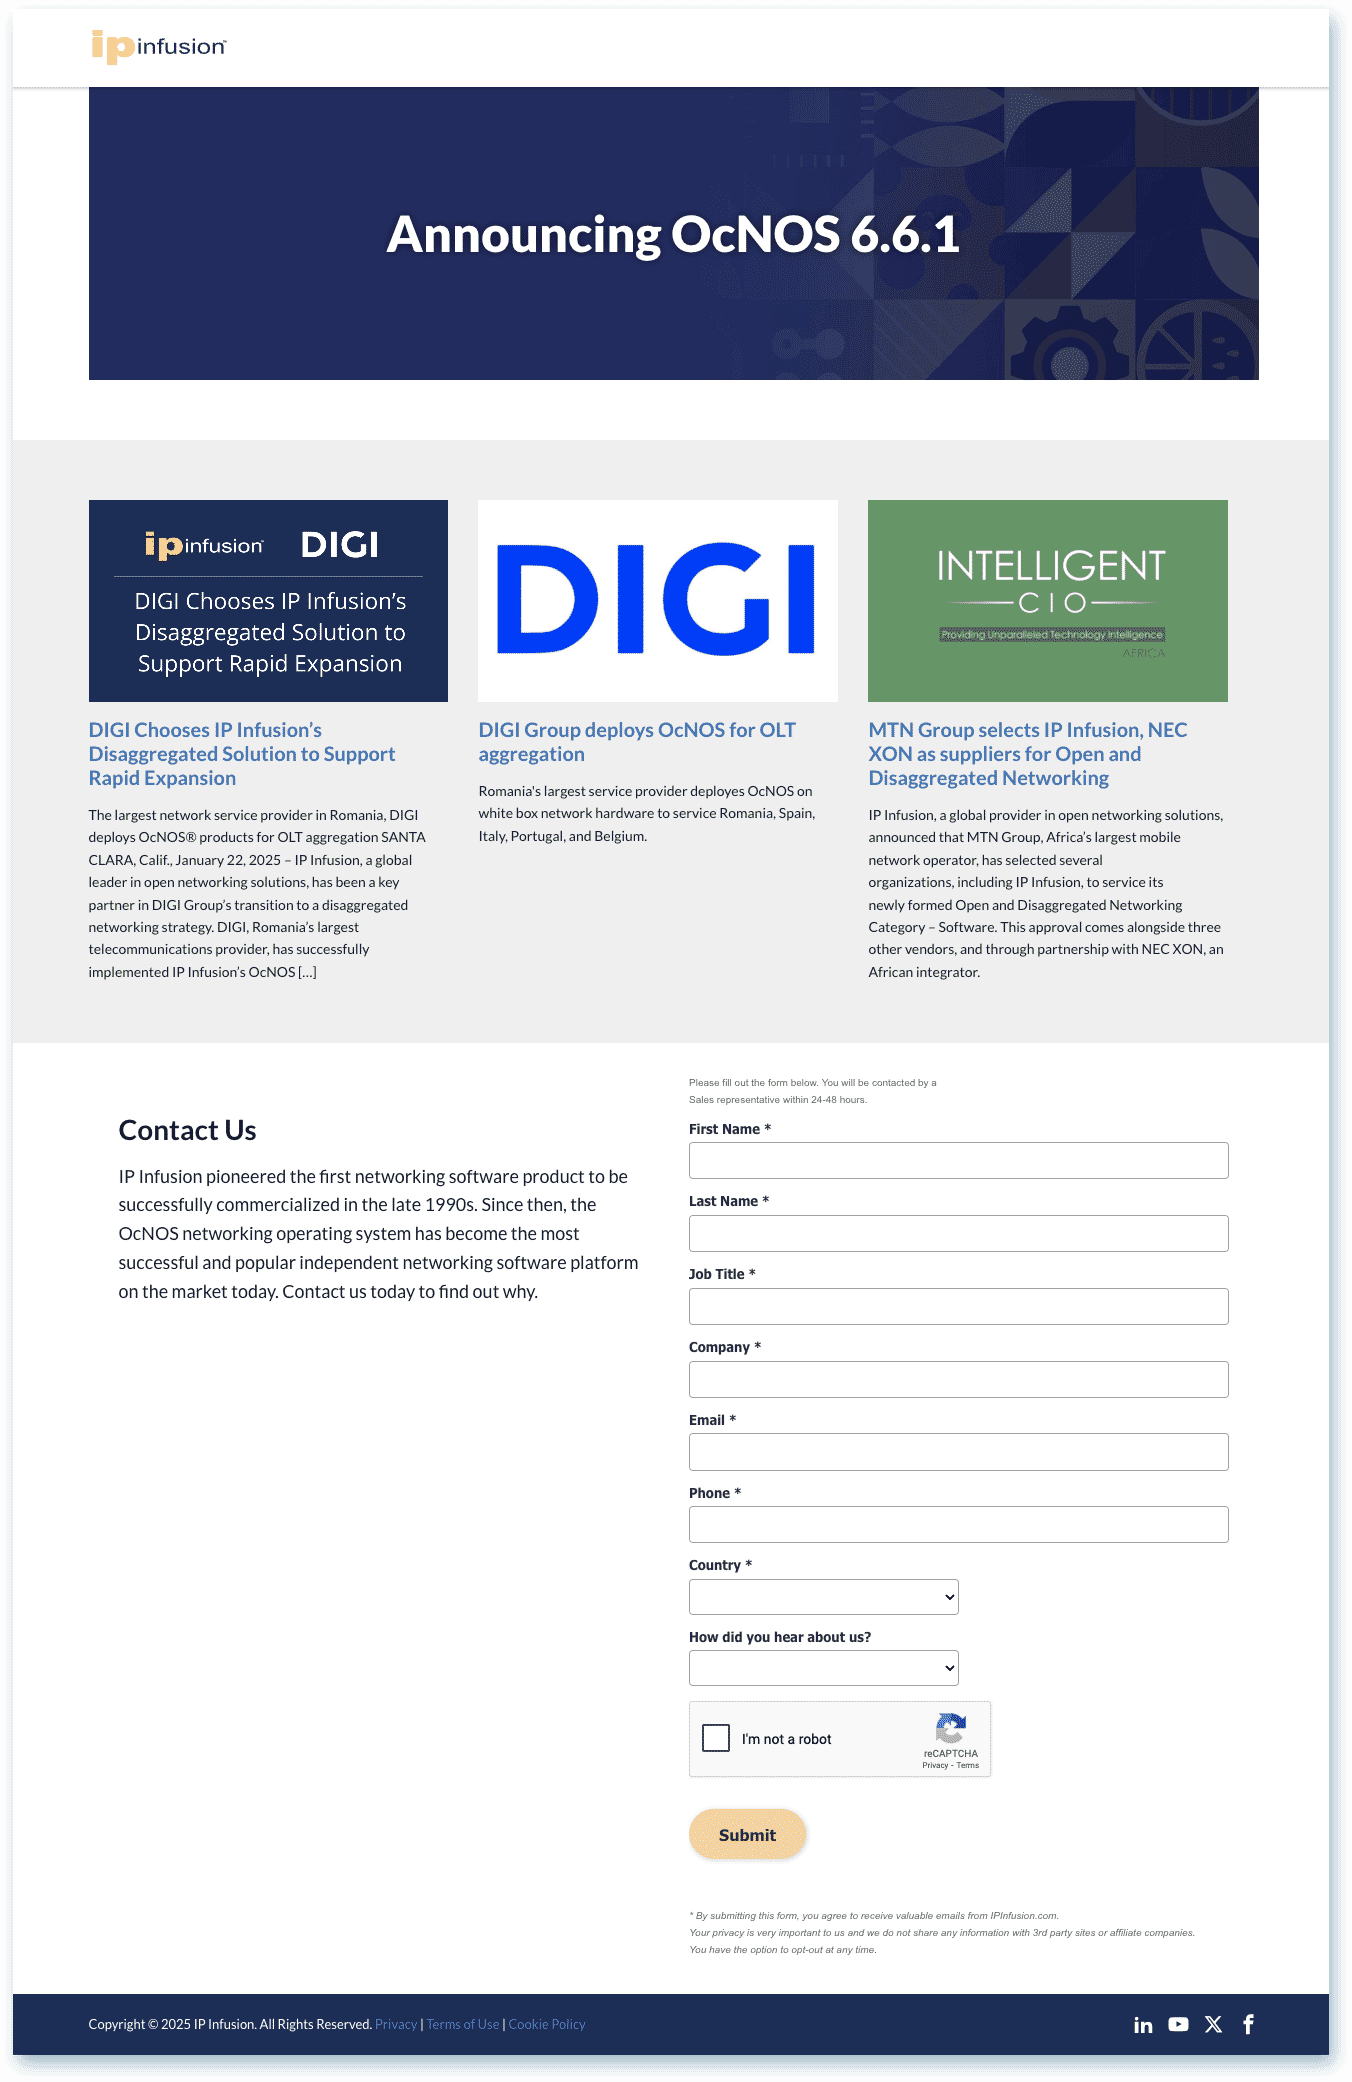 Page with text headline over bg image, 3 articles and CTA (click image to enlarge) | 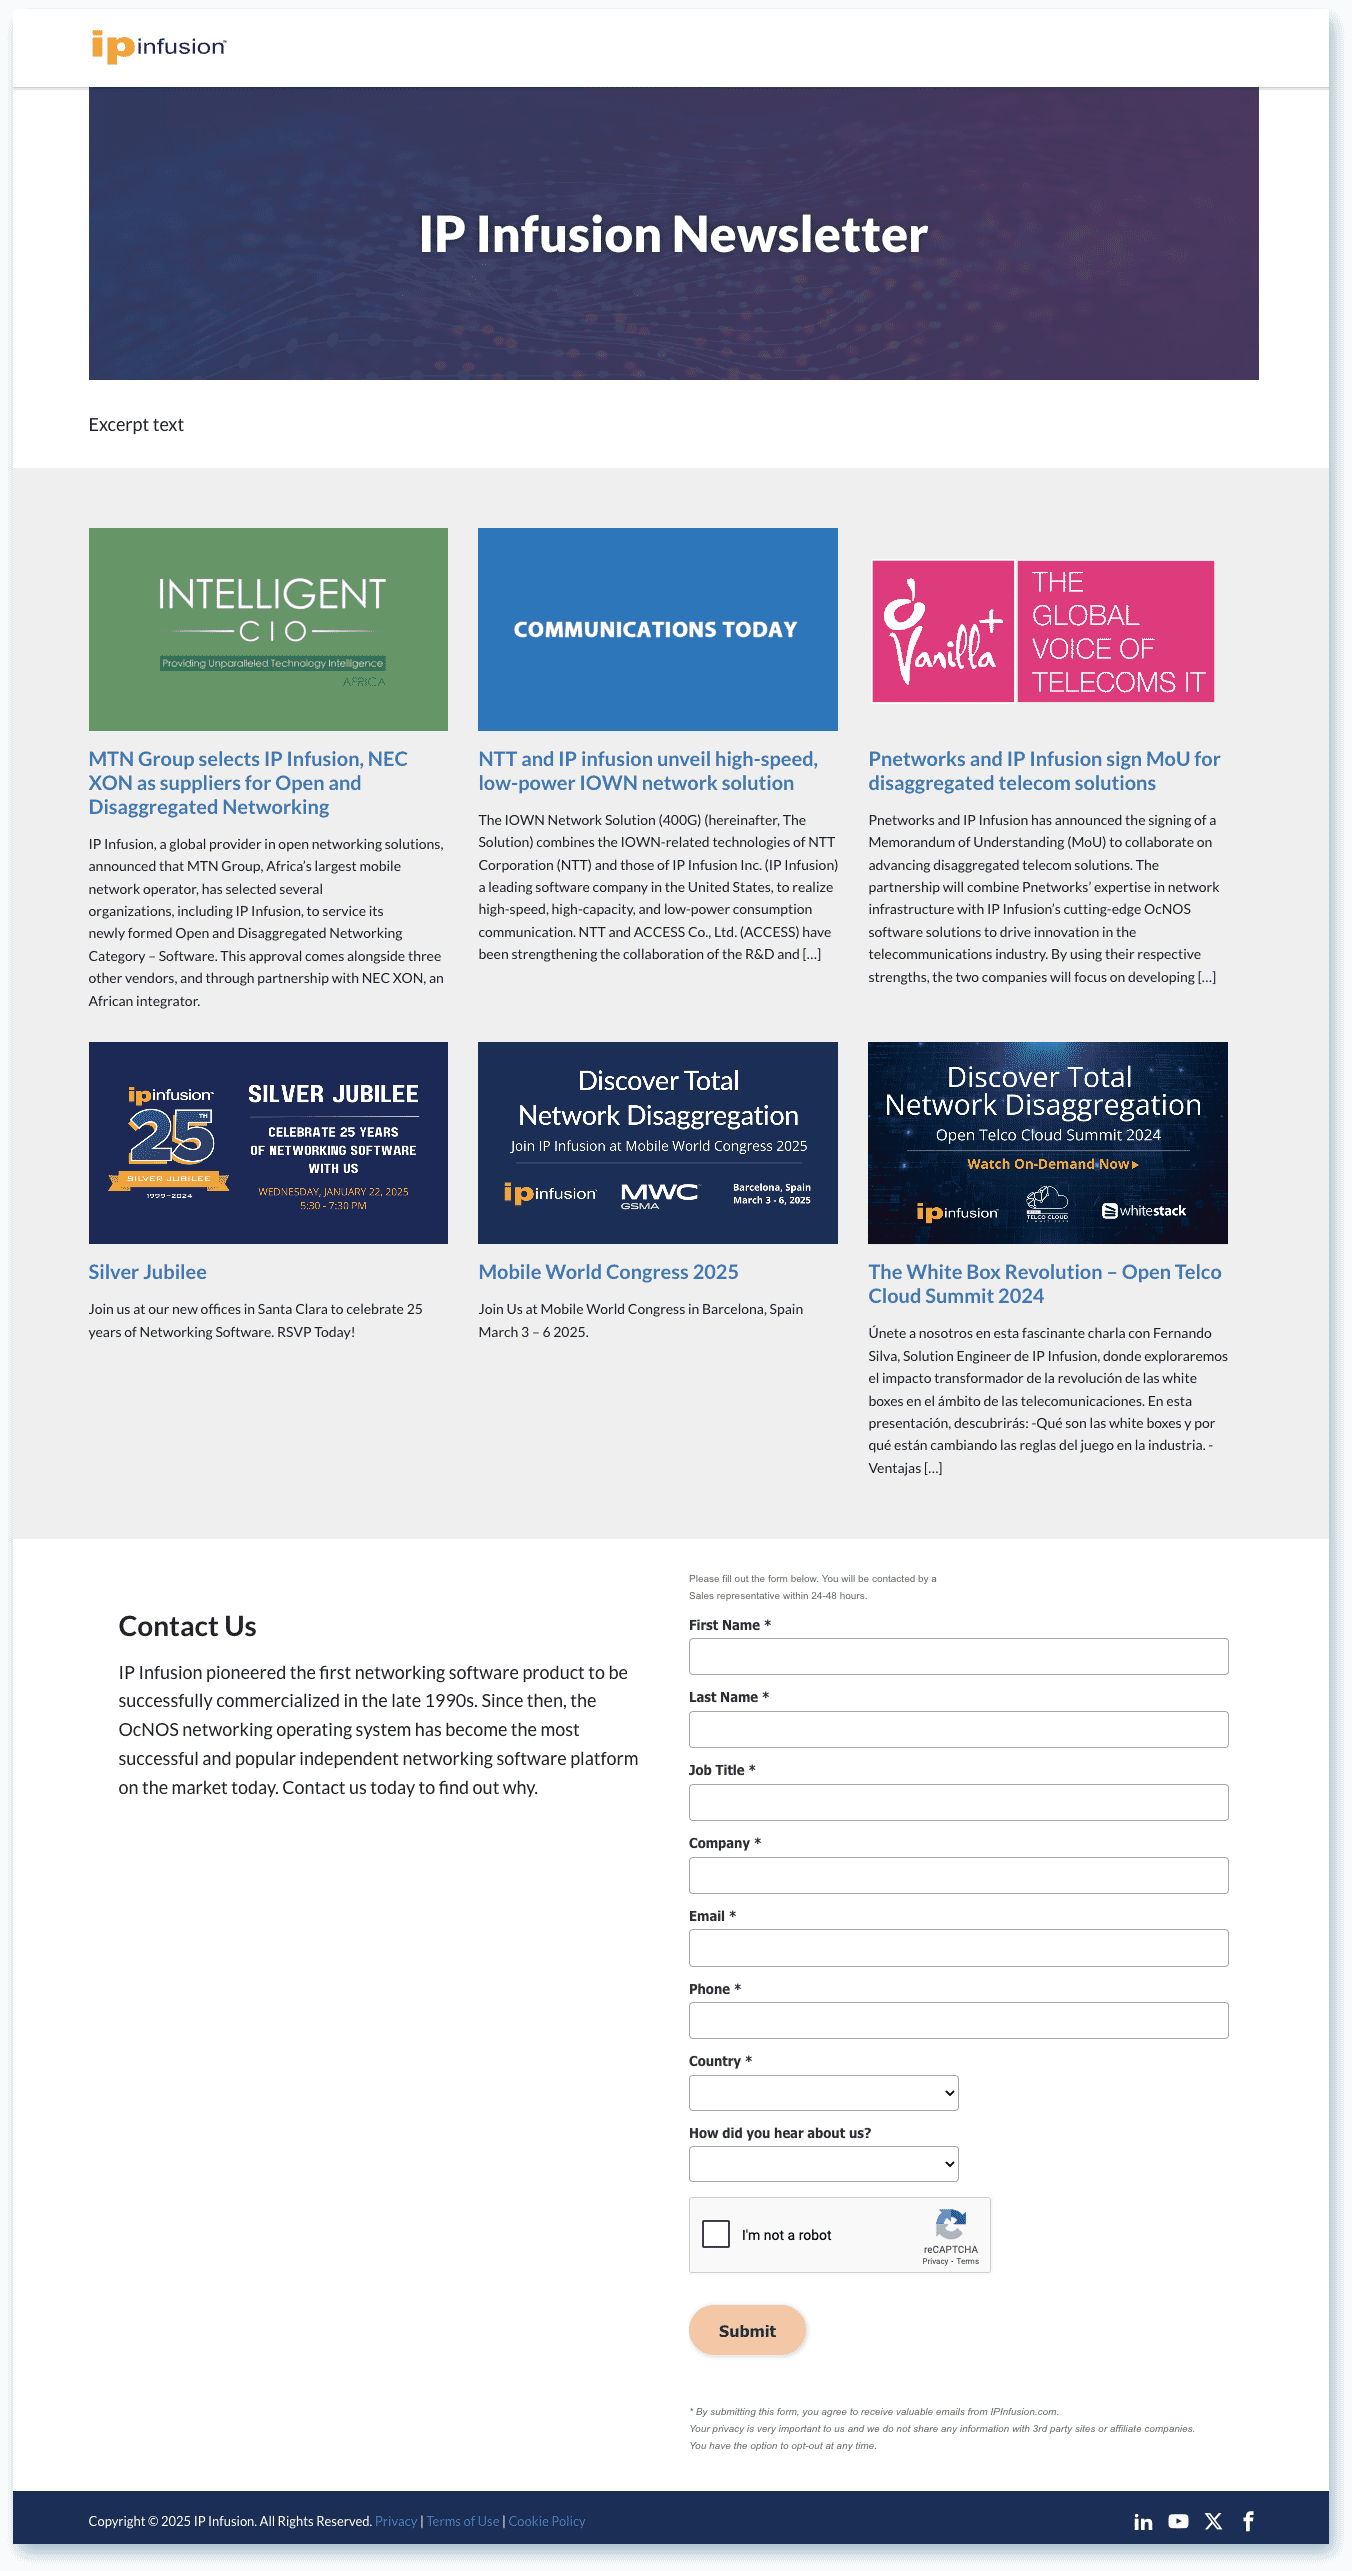 Page with text headline over bg image, 6 articles and CTA (click image to enlarge) |
|---|
HOW TO ADD BANNER IMAGES
On the lower right panel of the WordPress editor, there are two spots to add imagery.
The upper field in this panel is for the Banner Graphic URL. An image URL can be placed here for images uploaded to the WordPress media library, or hosted externally on a CDN or image hosting service. URLs can be absolute or relative, with relative URLs required to be hosted in the WordPress media library. Externally hosted images on CDN or image hosting services require absolute URLs; WordPress media library images can also use absolute URLs.
The second panel is for the Featured Image. This image will not be visible on your page, but it will be displayed whenever the URL is shared on social media post like on LinkedIn.com. Featured Images are required to be uploaded to the WordPress media library.

Graphic Tips and Tricks
- Use lower contrast & darker graphics so the white text will be readable over the banner
- Upload images to the WordPress Media Library, and then you can select it as the Featured Image for your landing page.
- Once in the media library, banners can be re-used on any landing page.
You can make themed banners for different campaigns to maintain a consistent look and feel. E.g., a logo can be in one corner for landing pages about different OcNOS products.
How Landing Pages and CTAs Work Together
At the bottom of a Lead Fusion Landing Page page, the section is split 50/50, with a form (CTA) on the right, and any desired content to the left.
CTAs are pre-configured in the Call to Actions section of the Admin Dashboard. As they are added to that section, they automatically show up in the Landing Page editor under the Call to Action tab.
The automatic CTA picker can be toggled off in a landing page, allowing a customized CTA and content to be added on a per-page basis. In this case, the iFrame or embed code for a CTA form must be prepared for entering into the rich text editor.
Configuring CTAs
Lead generation use a webform to capture prospect contact info. It is typically the first thing that is setup for a Landing Page. A Landing Page always has a webform at the bottom.
At IPI, webforms are created using Pardot, from Salesforce. Once forms are created in Pardot, they are published to the IPI website by generating an embed code, typically as an iFrame.
Webform embed codes are obtained from Nicole Bellemare, an IPI vendor at One Umbrella Marketing.
Lead Fusion Editing UI
WordPress content editing is done in either of two modes. One is the back end UI known as the Admin Dashboard. The other is a front end UI using visual editors like Gutenberg or other 3rd party plugins.
Lead Fusion supports both modes, with certain caveats. First, Lead Fusion requires using the Admin UI for most tasks, including adding new Landing Pages, entering a headline, adding an excerpt, editing permalinks, adding CTAs and feature images. Then Lead Fusion allows for content shopping using an interactive front end view. This UI is custom to Lead Fusion, and does not use Gutenberg or other plugins. Content shopping is also available in the Dashboard view, but it is less intuitive than Interactive Mode.
The interactive mode appears as an overlay column on the right side of the browser, once the Select Posts button is clicked. (The post must be Published first, before this view can be accessed). The interactive front end view will open in a new tab, while keeping the back end view active in the previous tab.
Edits done in the interactive mode are aware of the landing page to which they belong, as long as that interactive tab remains open.
Shopping Content vs. Authoring a Page
Lead Fusion is designed to be a quick method to assemble existing IPI content on a landing page, oriented around topics, in order to get leads. Lead Fusion pages are a collection of links to existing content in WordPress called Posts (Like Resources, Blogs, etc.). You do not author a page as you would in a CMS. Rather, you assemble links to already existing posts. This is the Content Shopping metaphor vs. Page Authoring.
EXAMPLE: You want to create a landing page with a collection of articles related to a new release of a product. It is needed quickly for a LinkedIn Post as part of a campaign to drive traffic. You don't have the time or staff available to write a blog or news release, but you have a custom headline the marketing team wants to test for clicks. Using Lead Fusion, you can quickly setup a landing page, shop for relevant articles on the site, add a few for that topic, add your custom headline and publish. It is much quicker than creating a page from scratch, and without writing anything more than a headline. You can add a short description if desired.
Supported Content Types in Lead Fusion
Any posts that Lead Fusion recognizes will have the 'Add' link appear next to them. While in the Select Posts mode, you can navigate to any page on the site front end. As you visit pages, the available content will have the Add link near it. This is most common in the Resources section of the IPI website, and that is where it is recommended to shop for content, as you will find the most articles and topics within Resources.
External Featured Image Support
LeadFusion landing pages can have a featured image from a URL hosted outside of the website. Default in WordPress behavior only allows images from the built-in media library. The IPI Site, and LeadFusion, allows external URLs to images, most often with images hosted on the IP Sirv.com CDN.
Custom Banner Images
Banner images can be custom, created in graphic apps. They can be two sizes. If no graphic is uploaded, a default image will be used [Add info on sizing]
Custom URLs
By default, Lead Fusion posts will use the text in the Title field as the 'slug' part of the URL. The slug is the part of the URL comes after the trailing slash of the domain. An example is: ipinfusion.com/example-of-a-slug. The full URL with domain and slug is known as a Permalink in WordPress.
Once a title is added and the post is published, WordPress will automatically create the slug, and it will appear just below the title field as a Permalink. If you wish to customize the slug to be different from the headline, you can click the Edit button and edit a slug of your choosing. Slugs must be all lower case, with hyphens instead of spaces, and no punctuation.
URLs are Public, but Not Shown in Navigation
The links to Landing Pages will not show up in the IP Infusion website navigation. They are valid and functional URLs, but they must be shared somewhere on the Internet in order for them to be clicked. Typically that will be in social media such as LinkedIn, but they can be shared by email, text, or added to other web pages, too. Thus landing pages can be created, tested, and shared internally as live URLs in advance of publishing them publicly.
Add posts manually in Edit Mode
Using a drop-down menu in the Admin Editor, you can select posts to add to a Landing Page. Available posts that are recognized by Lead Fusion will show up in the list automatically.